Chatter feed tracking, Field history tracking, and Field audit trial – confused ???

Chatter feed tracking, Field history tracking, and Field audit trial – confused ???

Given the importance of tracking changes to data for auditing and security purposes mainly in industries like healthcare and banking, it’s really important to understand how the standard OOTB options will work.

We all know Salesforce has various options to track changes to fields and records. Recently we had a requirement to track history of field changes on a custom object and I started with these OOTB options to check if any of these will work for us. after detailed analysis, we found that none of these are satisfying our requirement so we went with a custom approach. but the good thing is that I understood these options in detail and most importantly the differences. So I thought to put this in one place so that it might be helpful for someone who is confused same as I was.

Chatter Feed Tracking

Chatter is used for collaboration and you can follow a person or any record to get updates right in your Chatter feed. Feed tracking in Salesforce highlights changes to records by automatically announcing them in the record’s feed. you can track up to 20 fields per object and any changes to those fields will be posted to record Chatter feed automatically for users who are interested in any changes on that record.

few things to consider here

  1. Feed tracking needs Chatter enabled.
  2. Tracked feed updates that are older than 45 days and have no likes or comments are deleted automatically.
  3. With Chatter feed tracking enabled you don’t have “history” object created for your custom object so if you want to query the changes for any other processing or reporting purpose you can’t get that directly and you have to go through Feeditem and Feedtracked change objects. this will complicate the process.

you can get more details on feed tracking here.

Field History tracking

Field history tracking is enabled on the object and you can track up to 20 fields same as feed tracking. the tracked changes can be viewed on record detail page in history related list. once you enable field history tracking on the object the standard “history” object is created.

the main differences from feed tracking

  1. This feature is available automatically for any custom object and you just need to enable it at the object level.
  2. The field history data is retained for up to 18 months.
  3.  you can query the standard history object directly for you to do any processing or reporting on tracked changes.

Field Audit Trial

This is an add-on for field history tracking and comes with additional cost.Field Audit Trail lets you define a policy to retain archived field history data up to 10 years, independent of field history tracking. This feature helps you comply with industry regulations related to audit capability and data retention.

below are key things to consider

  1. This add-on is not automatically available in your org and requires you to contact Salesforce support.
  2. The additional cost which is something important to think about (you can use your own custom mechanism to retain the history for longer time by pulling the history data on a regular basis to some external system with less cost)
  3. Additional objects will be created for you to query the changes(FieldHistoryArchive) and also to define history retention policies (HistoryRetentionPolicy)
  4. tracked changes are retained up to 10 years.
  5. With this add-on, you can track up to 50 fields. (I couldn’t find any documentation though for this)
  6. Field audit trail is also linked with Platform shield. you can get more details here.

One important note on how the standard field history tracking works based on whether you purchase field audit trail add-on or not.

Field history increases beyond your current limits require purchasing the Field Audit Trail add-on following the Spring ’15 release. When the add-on subscription is enabled, your field history storage is changed to reflect the retention policy associated with the offering. If your org was created prior to June 2011 and your field history limits remain static, Salesforce commits to retain your field history without a limit. If your org was created after June 2011 and you decide not to purchase the add-on, field history is retained for a maximum of 18 months.

Hope this post will be helpful for someone who is looking differences between these three options at one place.

Happy Learning !!


How we got around with 9 Million Salesforce Queued jobs !!

How we got around with 9 Million Salesforce Queued jobs !!

Salesforce Future jobs are one of many different ways of asynchronous apex execution that Salesforce provides. when started future jobs will be added to the asynchronous queue and execute based on the resource availability which is explained in detail here.

Well, now you might be wondering whats special in there as future jobs will be queued before execution and they get executed eventually. But in our case, the jobs are never getting executed as there are huge, as I said millions.

We came across this situation a few days back where all of the sudden we started seeing a lot of jobs getting added to our Future jobs queue. The queue is growing at an incredible rate of 1 Million per day. Apparently, some trigger is causing this to happen which we don’t know how (or couldn’t figure out at that time). The application which is creating these jobs is not affected much as we have only a few users using it. But we have other applications sitting on the same Org and are being actively used by large user base and they also use Future jobs. with this issue, the jobs in other applications are not getting executed and what that means is they are not working as expected. This is where the problem started getting interesting (you know what that means when I say interesting)

So we have two things to do to solve this issue.

  1. First, stop the trigger that is creating these jobs so that new jobs will not be added to the queue. this is crucial and has to be done as quickly as possible given the rate at which the jobs are getting created. This is easy as we have to just inactivate the trigger.
  2. Second, is to abort all the queued jobs. Stopping the flow of new jobs doesn’t help much with solving the issue for jobs that are created by other applications as we have to abort the jobs that are in the queue. so that the jobs from other applications start executing as usual. this is a bit tricky as AyncApexJob only supports query operation.

System.abortJob(jobId)

We reached out to Salesforce to check if they have any easy way to abort these jobs from backend and to our surprise there is nothing. so we have to abort jobs ourselves.  System.abortJob(jobId) is used to abort the job and takes the jobId as a parameter. this method will take only one jobId at a time and we can only be called 150 times (internally it does a DML operation and we can only do 150 DML operations in a transaction) in a single transaction. we can run this from developer console and works well if we have only a few hundreds of jobs that we want to abort but as we have 9 Million jobs this solution is not scalable.

We decided to create a Batch job to do this which can be started from developer console. But the question is does the new Batch job get priority over the 9 Million job queue as batch apex is also asynchronous and will be queued. Luckily it does as Salesforce maintains a separate queue for each type of asynchronous apex jobs. Finally some party time. we started the batch job and it is running (yes today), and the estimated time is around 18 hrs.

The main intention behind writing this post is not to show the solution but,

  1. To explain how we approached the solution
  2. and more importantly to explain this rare situation which we got into (at least for me this is the first time) and tell not to panic 🙂

Hope this helps someone.

Happy Learning !!


Salesforce Lightning record pages and force:refreshview

Salesforce Lightning record pages and force:refreshview

Salesforce Lightning is everywhere now and we are getting more and more new features with every release. This is really exciting and also challenging specially for Developers who were working on classic Visualforce pages and Apex classes. with Lightning experience we have lot of things to learn and explore.Solution design needs a completely different approach compared to classic.

when building custom features in Lightning experience we can use Visualforce pages with SLDS to give the end user same standard Lightning experience or create custom Lightning components depending on how simple or complex flows you are trying to build. Go with a custom button which opens a Visualforce page or a custom action which opens a Lightning component. these are some examples of real word scenarios we encounter when we are building any solution.

In this post i am going to explain how we can use standard force:refreshview event to solve some real issues we face. you can check force:refreshview for event documentation.  This event is,

  1. Handled by one.app container. It’s supported in Lightning Experience and Salesforce1 only.

Below I am going to explain how both of the scenarios can be useful when we are creating custom lightning components with an example. Mainly when we add custom lightning components to “Lightning record pages” to customize the standard record detail pages.

Lightning record pages: Lightning record page or Flexi pages are used to customize the standard record detail pages in Lightning experience.

Scenario 1: Firing the standard force:refreshview event

Refresh standard detail view from a custom lightning component added in record detail page.

Example: Lets say we have a custom lightning component named CreateContactCmp on a Account detail page which is used to add a contact and there is a field on account which shows the number of contacts on account. this contact count field is updated in a trigger whenever a new contact is added to this account. The count field on Account detail view will show the updated value without user refreshing the account detail page. without this user have to refresh the page every time he adds a contact. or may be we can use some kind of hack to reload the page which is both not a good experience to user and not a best practice.

we can do this using force:refreshview event. In callback of the save method you fire the refresh event which is handled by the standard lightning container. This will refresh the Account record detail view and show the updated value for contact count field.sample JS controller save method below

saveContact : function(cmp,event,helper){

var saveContactAction = cmp.get("c.contactSave");
// your code to send contact details to server

actionSave.setCallback(this, function(a) {
    if (a.getState() === "SUCCESS") {
    //contact saved Successfully
    //Fire the refresh view event to update Account detail view
    $A.get('e.force:refreshView').fire();

   }else if (res.getState() === "ERROR") {
     console.log("Error while Saving Contact ");
   } 
});
 
$A.enqueueAction(saveContactAction);
}


Scenario 2: Handling the standard force:refreshview event

Refresh the custom lightning component added to lightning record page when standard record save happens.

The same example above say that every Account is associated with a country. In CreateContactCmp user should have a dropdown for list of states which are related to the country selected on the Account. user will select a state to link with the contact when he saves one. in most of the case we follow below approach to handle this requirement.

In the init method of CreateContactCmp we will check for the country on the contact and populate the state dropdown with list of states related to the country.

but what if the country value is not populated when user opens the Account and wants to create a contact. as there is no country associated to the account the state dropdown list will be empty. even if user adds country value on the account and saves it, the state dropdown list in the custom component will not populate as the component is already initialized. we can solve this by using handling the force:refreshview event. as i mentioned in the beginning force:refreshview event is fired by standard save action and we can handle this event is custom component and call the init method. below is the sample code of the CreateContactCmp on how to add handler to handle this event.

<aura:component controller=”ContactSaveCtrl”
implements=”force:appHostable,flexipage:availableForRecordHome,force:hasRecordID”
access=”global”>

<aura:handler name=”init” value=”{!this}” action=”{!c.doInit}”/>
<aura:handler event=”force:refreshView” action=”{!c.doInit}” />

<!– Your custom markup here –>

</aura:component

With this solution user need not refresh the account detail page after adding the country.

This helped us solve couple of issues we were facing when using Lightning record pages and custom lightning components and couldn’t find any article with complete details. so thought of writing this post so it would help others.

Happy Learning !!

Automate test classes running using Gearset

We all know that test classes are not automatically run when deploying to Sandboxes as compared to Production , where test classes are automatically run when deployment happens. This allows developers to work on code in Sandbox before it is completely done. But it also means many issues are not detected until you actually try to deploy to production.

Most of the times in a hurry to meet the release deadlines we finish development and deploy to next testing environments for QA to test the features. Then once we are done with the total development we start writing test classes. This way we miss the small changes that we have done which might lead to test failures. most likely due to regression.

Salesforce provides options to run test classes even when you deploy to sandboxes (Change sets and  ANT migration tool have an option to run test classes) , but its not enforced by Salesforce so you miss it or ignore it or there might be someone who don’t even know that this option exists.This way you only find the test class failures when you deploy to production which comes as surprise to both development and release teams.

One thing we can do to avoid this is to run the test classes in sandboxes on a regular basis as you do your development. but this again has to be done manually which we miss to do or lazy to do 🙂

Gearset is a free online tool which provides option to schedule unit tests run on a daily basis and get Email notifications when there are any test failures. this will be very useful and gives us alert on regression test failures way ahead before the actual production deployment. along with automated test class running Gearset also provides other useful options for making Development and Deployment easy.


Happy Learning !!


Salesforce: Parameterized Custom Labels

Custom Labels

As every salesforce developer knows, Custom labels are custom text values that can be accessed from Apex classes, Visualforce pages, or Lightning components. The values can be translated into any language Salesforce supports. Custom labels enable developers to create multilingual applications by automatically presenting information (for example, help text or error messages) in a user’s native language.

Even though the main purpose of custom labels is to create multilingual applications , the next big use of custom labels is to add customizable messages (like error , success messages , Help texts , UI labels and much more)  in applications without having to do a code deployment every time.

Parameterized Custom Labels

labels can also be parametrized , means we can add parameters in the label values and when we use it in page or class we can pass values to those parameters to get dynamic text values. In this post i will show how to use parameterized labels in VF page and class.

below is the example of how a parameterized custom label will look

Custom Label Parameter

Parameters are represented with integers starting with zero as shown above. when you pass parameters we need to make sure you pass them in the order you need.

Using Labels with parameters in VF page

below is the snippet which shows how to use the above label in VF page and pass parameter values.

<apex:outputText escape="false" value="{!$Label.Sample_Label}">
	<apex:param value="Parameter1_value"/>
        <apex:param value="Parameter2_value"/> 
</apex:outputText>

out put for the above label will be

“Sample Parameterized label. Parameter one Parameter1_value and Parameter two Parameter2_value”

Using Labels with parameters in Apex class

below is the snippet which shows how to use the above label in Apex class and pass parameter values.

List<String> parameters = new List<String>();

parameters.add(‘Parameter1_value’);

parameters.add(‘Parameter2_value’);

String sampleLabelwithParam = String.format(Label.Sample_Label, parameters);

then you can use “sampleLabelwithParam”  string wherever you want like Email body.


Happy Learning !!

Salesforce Login HUB Series #2

Salesforce Login HUB Series #2

In our last post Salesforce Login HUB Series #1 we discussed enabling identity provider in IDP and configured Single Sign-On settings in SP Orgs. In this post we will continue with next steps. as a reference below are all steps and we will continue with step 3

  1. Enable IDP in any one of the orgs you want to connect together.
  2. Configure SSO settings in all other orgs ( these all orgs act as SP).
  3. Add all orgs as Service Providers in IDP org.
  4. Test the SSO login flow.
  5. Create a HUB/Launcher App in IDP org to easily login to all Orgs with a single click.

Add all orgs as Service Providers in IDP org

in step 2 we configured SSO settings  in service provider org.  go to the SSO settings and make a note of the Salesforce Login URL from the endpoints section. it will look like below

https://eegasp-dev-ed.my.salesforce.com?so=00Do0000000ItZU

for every SP org you have to create a “Connected App” in IDP org. below are the steps to create a connected app in IDP org.

  1. Go to Setup ⇒ Create ⇒ Apps
  2. On Apps page click “New” button in Connected Apps section
  3. Enter a name which identifies the SP org to easily.
  4. API name will populate automatically or you can enter
  5. Enter contact email. this is used to send notifications if there are any errors.
  6. Go to Web App Settings and select “Enable SAML” checkbox
  7. Enter SP org my domain URL in Entity ID field
  8. Enter the Salesforce Login URL of the SP org URL (noted above) in ACS URL field
  9. Make sure that Subject Type field is set to Username
  10. leave all other fields intact and click on save
  11. we have to add profile access to these connected Apps
  12. on detail of the connected app , click on “Manage” button
  13. in next page click “manage profiles” in Profiles section
  14. from the list of profiles select “Identity Provider” and the profile of the user in IDP org whose credentials will be used to login to SP orgs
  15. click save button

Test the SSO login flow

now after configuring settings in both IDP and SP orgs we can test the SSO login flow. if you are not familiar with how generally the SAML assertion works below is the flow at high level. we will be using IDP org user “username” as the identifier which is matched against the Federation ID field of user in SP org.

  1. When you click SP org link,  “Federation ID” (Identity type) field from the user record will be sent to IDP in the SAML request as part of the subject (Identity Location). This is configured in SSO settings of SP org.
  2. when the request goes to IDP and if you are already logged into the IDP org, then the SAML request is checked for the Federation ID and is compared against the “Username” of the IDP org. This is configured in connected app that we created for the SP org in IDP.
  3. if both are matching then the authentication is successful and a SAML response is sent by IDP org to SP org.
  4. after checking the SAML response from IDP the SP org will return a login session to the user into SP org.
  5. at step 2 if user is not logged into IDP org already , the he is prompted to login to IDP org. here you have to use your IDP org credentials. This is similar to logging into organization’s LDAP system if your company has SSO implemented for all your internal Apps.

at high level we saw how the SSO flow works. next step is to update the”Federation ID” field on SP user with IDP user “username”. once you are done with this step then we are all set to test the flow.

logout of all sessions both IDP and SP org.

  1. first login to IDP org using the user credentials you have chosen to use as SSO user.
  2. after successful login , open the SP org  URL in a new tab. when you open the SP org my domain URL it will start the SSO login flow.
  3. and as you are already logged into IDP org (because you are in same browser window) the SSO flow finishes and you will be automatically logged into SP org also.
  4. you can also test the flow without logging into IDP first and just open the SP org URL. in this case you will be redirected to IDP org login page and you have to login using your IDP org user credentials. once authentication is successful you will be redirected to the SP org.
  5. so in this way you only need to remember the IDP org User credentials and you can login to multiple SP orgs.

Create a HUB/Launcher App in IDP org to easily login to all Orgs with a single click

This is really not part of the Salesforce HUB creation steps. but to just make the login process to all SP orgs easy. We can create a simple VF page with name “Org Launcher”(similar to salesforce App launcher)  in IDP org with links to all SP org my domain URLs  and may be a description of each org. In this way you need not remember the SP org my domain URL every time and the description will help you find the right org when you are looking/finding something.

below is the VF page markup just for one SP org. you can add as many SP orgs as you want in the same way.

Launcher HTML snippet

once you create this page in IDP org you can just open this page and click on respective link to login to that SP org.

Below is the screen shot of how my “Org Launcher” page looks like

Eega Org Launcher

with above launcher its very easy for me to login to different orgs with just a single click.

hope this Salesforce Login HUB series will be useful and interesting to all of you. Thank you for reading.  please don’t hesitate to comment or reach out to me directly in my email if you have any questions. i will be more happy to help.

Happy Learning !!


Salesforce Login HUB Series #1

Salesforce Login HUB Series #1
  • Are you a Developer ? Do you have multiple Developer Orgs that you use to try out different  features that salesforce provides? So then definitely you might be having difficulty in remembering all those usernames and passwords. and more importantly difficulty in finding what features, examples or POCs that you tried in each org.
  • Is your business using salesforce as a centralized platform to handle all day-to-day business operations and have multiple salesforce Orgs for different business groups. Then you might be having common users who need to use applications across multiple salesforce orgs.  This might create hard-time for users to remember multiple usernames and passwords to login into different salesforce  orgs to access the applications.

If you are in any of the above situations then we have a simple solution for that using salesforce “Identity Provider” feature.

You might already know that salesforce can also be used as an “Identity Provider” ( if you have worked on SSO implementation for salesforce org using any external Identity providers like Microsoft Active Directory or LDAP authentication). Yes salesforce can act as both Service Provider (SP) and also Identity Provider (IDP) for any third party applications that you are using out of salesforce . The same IDP feature can be used to connect multiple salesforce orgs as a “Salesforce HUB” by enabling one of the salesforce org as “Identity Provider” and all other salesforce Orgs will act as Service Providers. Then you only need to remember one username and password of the IDP enabled org and can easily login to the other Orgs with just a one click.

Note: Here we will be setting up Salesforce org as IDP so we need to enable My Domain in the org which we want to enable as Identity Provider. and all other Orgs will act as Service Providers and use SP initiated SSO login flow. For SP initiated login flow you need to enable My Domain feature of salesforce for all your Orgs.

I have that HUB created for all my developer Orgs and here I will explain the steps for setting up the HUB.

below are the steps for creating a Login HUB.

  1. Enable IDP in any one of the orgs you want to connect together.
  2. Configure SSO settings in all other orgs ( these all orgs act as SP).
  3. Add all orgs as Service Providers in IDP org.
  4. Test the SSO login flow.
  5. Create a HUB/Launcher App in IDP org to easily login to all Orgs with a single click.

Enable IDP in any one of the org you want to connect together

Select any one of the orgs that you want to enable as Identity Provider and configure the IDP settings in the Org as below.

Go to Setup ⇒ Security Controls ⇒ Identity Provider

Enable the identity provider and create a certificate. You can create a certificate by editing the identity provider or you can go to Certificate and Key Management section within security controls and create a certificate. once you create a certificate here it will be available for you to select in Identity Provider. you can create both Self signed and also Certificate Authority (CA) signed certificates. for our case we will go with self-signed certificate. but if you are planning to use this solution in any production environment you have to definitely go for a CA signed certificate.

Once you have the certificate, download it on to your local system and keep it. we will be using this certificate when we configure SSO settings in other Orgs.

Make note of the IDP Org My Domain URL and IDP endpoint URL. it will be as below. my domain is your domain name. we will be using this URL when we configure SSO settings in other orgs which will act as service providers.

IDP Org My Domain URL:

https://mydomain.my.salesforce.com (for production editions)

https://mydomain-dev-ed.my.salesforce.com (for Developer editions)

IDP org endpoint URL:

https://mydomain.my.salesforce.com/idp/endpoint/HttpPost (for production editions)

https://mydomain-dev-ed.my.salesforce.com/idp/endpoint/HttpPost (for Developer editions)

below is the snapshot of how Identity Provider page looks in salesforce. here https://eegaidp-dev-ed.my.salesforce.com is my IDP org my domain URL.

Identity Provider

Configure SSO settings in all other SP orgs

In Service Provider Org you have to add “Single Sign-On” settings. make a note of the my domain URL of the SP Org. below are the steps and details to add.

Go to Setup ⇒ Security Controls ⇒ Single Sign-On settings

Enable SAML in Federated Single Sign-On Using SAML section and add a new SAML configuration in by clicking “New” button in SAML Single Sign-On Settings. Enter the details as follow for the new SAML configuration.

  1. For Name and API name enter the name that you are comfortable.
  2.  Issuer : enter the “IDP Org My Domain URL” of the IDP org which you noted in first step.
  3. Entity ID : enter the my domain URL of current SP ORG.
  4.  Identity Provider Certificate : upload the self signed certificate of IDP that you downloaded in first step
  5. Request Signing Certificate : should be “Default Certificate”
  6. Request Signature Method : should be “RSA-SHA1”
  7. Assertion Decryption Certificate : should be “Assertion not encrypted”
  8. SAML Identity Type : Select option “Assertion Contains Federation ID from the User object”
  9. SAML Identity Location : select option “Identity is in the NameIdentifier element of the Subject statement”
  10. Service Provider Initiated Request Binding : select option “HTTP POST”
  11. Identity Provider Login URL : Enter the “IDP org endpoint URL” that you noted down in first step.
  12. Identity Provide Logout URL : you can use either the SP org my domain url or standard salesforce login url https://login.salesforce.com
  13. keep other options intact and save the configuration.

below is the snapshot of how Single Sign-On Settings looks like in SP Org. here https://eegaidp-dev-ed.my.salesforce.com is IDP my domain URL and https://eegasp-dev-ed.my.salesforce.com is the SP Org my domain URL.

SP SSO config

In my next post will continue the next steps. Happy Learning !!

Salesforce APIs – What and When to use ???

Salesforce APIs – What and When to use ???

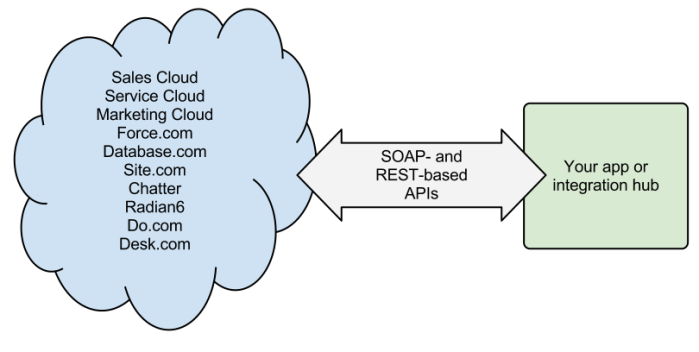
Salesforce provides programmatic access to your organization’s information using simple, powerful, and secure application programming interfaces.

Open-apis-2

Here in this blog post i will consolidate the details for these APIs from different sources into one place to make it easy understanding the APIs and finding out when to use which API. this might not be all of the details , but i tried my best to put all things together. Please make sure that you use this as a reference and also check other resources before you proceed .At the end i also listed out  few tips from my experience to consider when using these APIs.

What each API provides

Following is a quick detail about what each API provides. for more information on how to access and use Salesforce APIs you can go to each link:

  • REST API – Access objects in your organization using REST.
  • SOAP API – Integrate your organization’s data with other applications using SOAP.
  • Tooling API – Build custom development tools for Force.com applications. Coming soon!
  • Chatter REST API – Access Chatter feeds and social data such as users, groups, followers, and files using REST.
  • Bulk API – Load or delete large numbers of records.
  • Metadata API – Manage customizations in your org and build tools that manage the metadata model (not the data, itself).
  • Streaming API – Provide a stream of data reflecting data changes in your organization.
  • Apex REST API – Build your own REST API in Apex. This API exposes Apex classes as RESTful Web services.
  • Apex SOAP API – Create custom SOAP Web services in Apex. This API exposes Apex classes as SOAP Web services.
  • Data.com API – Data.com provides 100% complete, high quality data, updated in real-time in the cloud, and with comprehensive coverage worldwide.

When to use each API

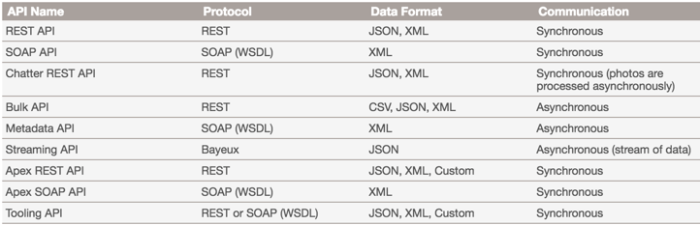
Now you know what each API provides and you might be thinking from these wide options which is suitable to my use case and when to use which API. below table gives the protocol , Data format and type of communication for each API. and followed by when to use each API.

Salesforce APIs

When to Use REST API

REST API provides a powerful, convenient, and simple REST-based Web services interface for interacting with Salesforce. Its advantages include ease of integration and development, and it’s an excellent choice of technology for use with mobile applications and Web projects. However, if you have many records to process, consider using Bulk API, which is based on REST principles and optimized for large sets of data.

When to Use SOAP API

SOAP API provides a powerful, convenient, and simple SOAP-based Web services interface for interacting with Salesforce. You can useSOAP API to create, retrieve, update, or delete records. You can also use SOAP API to perform searches and much more. Use SOAP APIin any language that supports Web services.

For example, you can use SOAP API to integrate Salesforce with your organization’s ERP and finance systems. You can also deliver real-time sales and support information to company portals, and populate critical business systems with customer information.

When to Use Chatter REST API

Use Chatter REST API to display Salesforce data, especially in mobile applications. Responses are localized, structured for presentation, and can be filtered to contain only what the app needs. In addition to Chatter feeds, users, groups, and followers, Chatter REST APIprovides programmatic access to files, recommendations, topics, notifications, Data.com purchasing, and more. Chatter REST API is similar to APIs offered by other companies with feeds, such as Facebook and Twitter, but it also exposes Salesforce features beyondChatter.

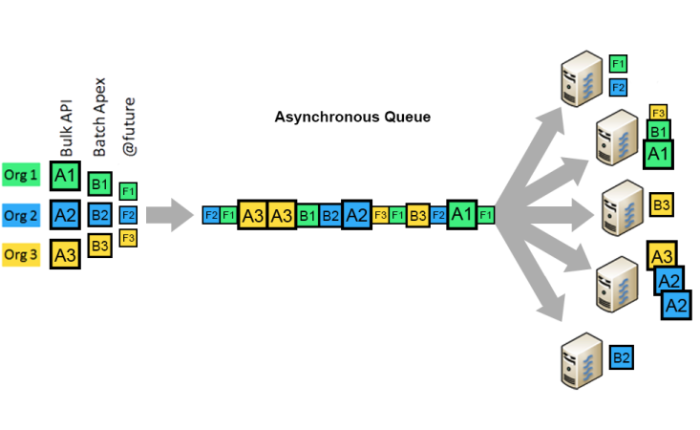
When to Use Bulk API

Bulk API is based on REST principles and is optimized for loading or deleting large sets of data. You can use it to query, insert, update, upsert, or delete many records asynchronously by submitting batches. Salesforce processes batches in the background.

SOAP API, in contrast, is optimized for real-time client applications that update a few records at a time. SOAP API can be used for processing many records, but when the data sets contain hundreds of thousands of records, SOAP API is less practical. Bulk API is designed to make it simple to process data from a few thousand to millions of records.

The easiest way to use Bulk API is to enable it for processing records in Data Loader using CSV files. Using Data Loader avoids the need to write your own client application.

When to Use Metadata API

Use Metadata API to retrieve, deploy, create, update, or delete customizations for your organization. The most common use is to migrate changes from a sandbox or testing organization to your production environment. Metadata API is intended for managing customizations and for building tools that can manage the metadata model, not the data itself.

The easiest way to access the functionality in Metadata API is to use the Force.com IDE or Force.com Migration Tool. Both tools are built on top of Metadata API and use the standard Eclipse and Ant tools respectively to simplify working with Metadata API.

  • Force.com IDE is built on the Eclipse platform, for programmers familiar with integrated development environments. Code, compile, test, and deploy from within the IDE.
  • The Force.com Migration Tool is ideal if you use a script or the command line for moving metadata between a local directory and aSalesforce organization.

When to Use Streaming API

Use Streaming API to receive notifications for changes to data that match a SOQL query that you define.

Streaming API is useful when you want notifications to be pushed from the server to the client. Consider Streaming API for applications that poll frequently. Applications that have constant polling against the Salesforce infrastructure consume unnecessary API call and processing time. Streaming API reduces the number of requests that return no data, and is also ideal for applications that require general notification of data changes.

Streaming API enables you to reduce the number of API calls and improve performance.

When to Use Apex REST API

Use Apex REST API when you want to expose your Apex classes and methods so that external applications can access your code through REST architecture. Apex REST API supports both OAuth 2.0 and Session ID for authorization.

When to Use Apex SOAP API

Use Apex SOAP API when you want to expose Apex methods as SOAP Web service APIs so that external applications can access your code through SOAP.

Apex SOAP API supports both OAuth 2.0 and Session ID for authorization.

When to Use Tooling API

Use Tooling API to integrate Salesforce metadata with other systems. Metadata types are exposed as sObjects, so you can access one component of a complex type. This field-level access speeds up operations on complex metadata types. You can also build custom development tools for Force.com applications. For example, use Tooling API to manage and deploy working copies of Apex classes and triggers and Visualforce pages and components. You can also set checkpoints or heap dump markers, execute anonymous Apex, and access logging and code coverage information.

REST and SOAP are both supported.

API Governor Limits

Once you understand what each API provides and when to use which API, the next thing you need to understand is the “Salesforce API governor limits”. It is very important to know what are the limits based on your salesforce edition and validate them against your integration use case that you want to implement. below is the link for API limits from salesforce limits cheatsheet which provides details for all API limits based on your salesforce edition and licenses.

Salesforce API limits

Useful Tips/Points when using Salesforce APIs

  1. Understand all different APIs provided
  2. Validate your use case against each API to decide which API will satisfy your requirement.
  3. Check out if you can make use of any ETL tool (like Informatica, Pentaho, Dell Boomi etc.) or any AppExchange app before you go and implement your own solution from scratch.
  4. Advantage of using an existing tool is quick roll out of your integration to production and there is no maintenance of the code.
  5. Advantage of implementing your own solution from scratch is you have more control of what you implement , can customize it your specific needs and need not depend on the tool vendor for any upgrades.
  6. Whether you use any third party tool or implement your own solution you need to make sure that you consider Salesforce API limits in deciding on the record batch sizes and few other details to make sure you wont hit salesforce limits when the integration runs.
  7. You need to be more cautious from “batch size” perspective if you have any triggers, Process builder processes , workflows on the objects and make sure you bulkify them.

Above tips are general and can be applied to any use case. make sure that you also consider your specific implementation use case to see if they are any other implications.


Salesforce – Exporting data into an Excel workbook

Salesforce – Exporting data into an Excel workbook

Why we need to Export?

below are few of many use cases why we need to export data

  • you want to take a quick backup of the data that you own or need to work on.
  • you want to share data with executives/product owner who want to take a look at summarized or detailed data without logging into Salesforce.
  • Use external tools to generate more complex reporting on data you have in Salesforce.

What Salesforce Provides OOTB?

Salesforce provides OOTB feature to export data as a CSV file. you can also use Data Loader or excel connector to export data into a CSV file or Excel sheet. but these are mainly used by Salesforce administrators or Developers. For end users these tools might not make sense and we need to provide them an easy way. On top of that with most of the applications taking on custom UI to comply with the branding and provide more user experience, we need to provide custom download functionality.  Continue reading “Salesforce – Exporting data into an Excel workbook”